5% Off Powermat

Join The Community

Wednesday, June 30, 2010

Fix iPhone iOS 4 MMS / APN Issue After Jailbreak with Redsn0w 0.9.5b5-5


The iPhone Dev Team has just updated Redsn0w to version 0.9.5b5-5. Some iPhone users were complaining about MMS and APN issues on their jailbroken iOS 4 devices. Well the good news is that you can now fix this issue with this latest version of Redsn0w. The official change log is as follows.

Redsn0w 0.9.5b5-5
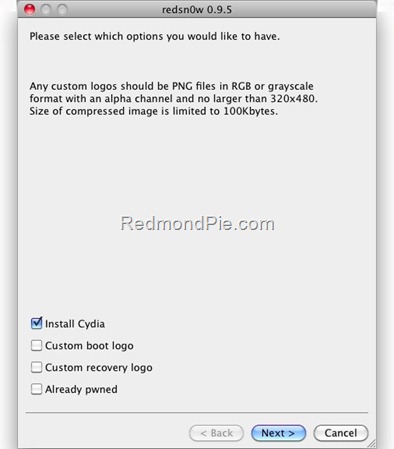
The latest redsn0w beta should fix any APN or MMS issues that users were seeing. It’s safe to re-run it on an already jailbroken iPhone without restoring…just deselect “Install Cydia” if you do that.
Instructions to jailbreak iPhone 3G and iPod touch 2G on iOS 4 using Redsn0w 0.9.5 as usual are exactly similar to the last release. If your phone is already jailbroken, just deselect “Install Cydia” option and re-run the jailbreak. Please read all the instructionsposted here carefully before upgrading and jailbreaking your phone on iOS 4.
Once you have jailbroken your phone, you can unlock it using ultrasn0w 0.93 (on anybaseband), guide for which is posted here.

Download iOS 4
Download Redsn0w 0.9.5b5-5 for Mac
Download Redsn0w 0.9.5b5-5 for Windows
Download iTunes 9.2 for Windows and Mac

You may also like to check out:
You can follow me on twitter to keep yourself updated on all the latest jailbreaking and unlocking releases.

Source: redmondpie

Sunday, June 27, 2010

Spirit Jailbreak Fix for iTunes 9.2 on iOS 3.1.3 for iPhone and iOS 3.2 for iPad


The best and the most easiest jailbreak tool has just been updated (unofficially?) to bring support for iTunes 9.2. Earlier when Apple released the final version of iTunes 9.2, it broke the compatibility with Spirit and so this new version brings the required fix to make it compatible with iTunes 9.2. However no new feature has been added. It still does not work with iOS 4 and iPhone 4. Only iOS 3.1.3 and 3.1.2 for iPhone 3GS, 3G, 2G, iPod touch, and iOS 3.2 for iPad is supported.

Spirit with iTunes 9.2
Instructions are still the same. You can follow our complete step by step guides to jailbreak your iPad, iPhone 3GS, 3G, 2G and iPod touch 3G/2G on 3.1.3 using Spirit.
For those of you with iPhone 3GS (new bootrom), iPod touch 2G (MC model) and iPod touch 3G who upgraded to iOS 4, only to find out that you cant jailbreak it back can actually downgrade back to iOS 3.1.3 and then jailbreak it using Spirit. Step by step guide for downgrading your iOS device from iOS 4 to iOS 3.1.3 can be found here (works only if you have SHSH blobs saved for 3.1.3).
Unlocking can be done on any baseband using Ultrasn0w 0.93, instructions for which isposted here.
Download Spirit for Windows (with iTunes 9.2 support)
Download iTunes 9.2 for Window and Mac
You may also like to check out:
You can follow me on twitter to keep yourself updated on all the latest jailbreaking and unlocking releases.

source: redmondpie

How to Save iPhone 4 SHSH Blobs (ECID SHSH) on iOS 4


TinyUmbrella has been updated to support iPhone 4 (running iOS 4). It is important to save SHSH Blobs (ECID SHSH) files of your iPhone 4 now because of all the rumors going around regarding a new firmware update, which could be released as early as next week. If you have your SHSH blobs on file, you can downgrade anytime to iOS 4 from iOS 4.01should you need to.

iPhone 4
Some important notes for iPhone 4 SHSH blobs before you proceed.
If you desire to restore your iPhone 4 to iOS 4, make sure you uninstall Wi-Fi Sync before trying to do so.
In order to obtain your SHSH you MUST have the device attached.
Restores on the iPhone 4 are not perfect. They error out locally but the restore does complete – it just needs to be helped along. (Much like downgrades where the baseband update fails). I’ll try to put the functionality in TinyUmbrella to fix this.
For Mac users: Copy the app OUT OF THE DMG. The reason you are getting the repeating password prompts is because you ran the app from within the DMG. This is bad. Copy it anywhere and you’ll be fine.
TinyUmbrella
From here onwards, you can simply follow the steps that i have posted here for iPhone 3GS and iPod touch. These steps are essentially the same for iPhone 4 except for some of the notes that I have posted above. Oh and if you want to learn more about what SHSH blobs or ECID SHSH files are, you can do so by reading one of my old article posted here.
Download TinyUmbrella (Windows)
Download TinyUmbrella (Mac OS X)
You may also like to check out:
You can follow me on twitter to keep yourself updated on all the latest jailbreaking and unlocking releases.

Source: redmondpie

ToolJail 2.2 for iOS 4 iPhone and iPod touch Jailbreak Assistance


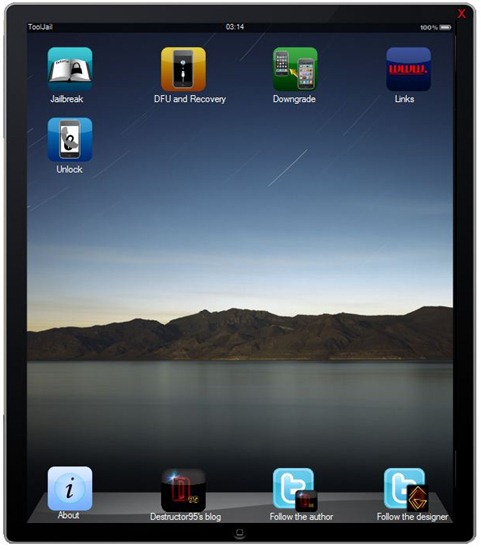
ToolJail has been just updated to version 2.2. This new version brings updates tojailbreak and unlock guides, and links for jailbreak tools for the newly released iOS 4. For those of you who don’t know, ToolJail (like f0recast) is designed to help iPhone newbie’s to jailbreak and unlock their iPhone and iPod touch. It contains all the necessary jailbreakand unlock instructions, along with how-to’s on DFU and Recovery Mode, downgradingfirmware, and direct download links for all the necessary tools required.

ToolJail 2.2
Some of the changes which version 2.2 of ToolJail brings are as follows.
  • New UI enhancements
  • Updated Jailbreak and Unlock guides for iOS 4
  • Updated download links for existing and new jailbreak and unlocking tools
Download ToolJail 2.2 for Windows
Download .NET Framework 3.5 (required to run ToolJail)
You may also like to check out:
You can follow me on twitter to keep yourself updated on all the latest jailbreaking and unlocking releases.

Source: redmondpie

Thursday, June 24, 2010

Jailbreak iOS 4 iPhone 3GS 3G with Sn0wbreeze [Custom Firmware Windows]


Sn0wbreeze 1.6 has been released. This is by the same developer who is behind other popular iPhone jailbreak tools such as sn0wbreeze for iPhone 3.1.3f0recast andBlackBreeze. Just like the PwnageTool for Mac, Sn0wbreeze 1.6 can jailbreak iPhone 3GS (old bootrom, and already pwned on 3.1.2 with anything other than Spirit), iPhone 3G and iPod touch 2G (non MC model).

Sn0wbreeze 1.6 for 4.0
So if you have a Windows machine, you can use Sn0wbreeze 1.6 to create custom firmware files without the upgraded baseband. Again, just like the PwnageTool 4.0 / 4.01, only the following devices are supported.
  • iPhone 3G/3GS (old bootrom/already jailbroken with anything other than Spirit)
  • iPod Touch 2G (non MC model)
Instructions are as follows.
Step 1: Download and install the latest version of iTunes.
Step 2: Now start iTunes and sync your iPhone with your PC so that it backs-up all your important data including settings, apps, music, contacts and photos.
Step 3: Download Sn0wbreeze and the original iOS 4 firmware file for your version of iPhone or iPod touch (download links given below). Move all these files to your desktop.
Step 4: Start Sn0wbreeze and select “Simple Mode”.
sn0wbreeze 3.1.3
Step 5: Sn0wbreeze will now ask you to browse for your .ipsw file. Select the correct iOS 4 firmware .ipsw file by clicking the “Browse” button. Sn0wbreeze will verify the selected file and then will present you with following screen.
Sn0wbreeze 1.6 for 4.0 (1)
Step 6: Click on "Yes" when Sn0wbreeze asks you “Do you want to activate your iPhone?” for hacktivation. Click on “No” only if you are on an officially supported carrier like AT&T.
sn0wbreeze 3.1.3
Step 7: Sn0wbreeze will now create the custom .ipsw file for your iPhone which will be jailbroken.
sn0wbreeze 3.1.3sn0wbreeze 3.1.3
Step 8: Now you will have to restore your iPhone to this custom firmware 4.0 that you just cooked using Sn0wbreeze for your iPhone. Click on your phone from the sidebar in iTunes and then press and hold left “Shift” button on the keyboard and then click on “Restore” (Not “Update” or “Check for Update”) button in the iTunes and then release the “Shift” button.
This will make iTunes prompt you to select the location for your custom firmware 4.0. Select that custom .ipsw file and click on “Open”.
Step 9: Now sit back and enjoy as iTunes does the rest for you. This will involve a series of automated steps. Be patient at this stage and don’t do anything silly. Just wait while iTunes installs the new iOS 4 on your iPhone. Your iPhone screen at this point will be showing a progress bar indicating installation progress. After the installation is done, iPhone will restart automatically and you should now have a fully jailbroken iPhone running on iOS 4.
How to: Unlock iPhone on iOS 4.0 (Any Baseband): Follow the complete step by step guide posted here to unlock iPhone 3GS and iPhone 3G, on iOS 4, on any baseband using Ultrasn0w 0.93.
Step 10: Once you are done with the unlocking and jailbreak process. You can now restore all your settings, apps, music, contacts and photos to the newly installed iOS 4 by restoring the backup that you made in Step 2 from iTunes.
Feel free to ask me any question here should you run into any problem during the jailbreak process.
Download iTunes 9.2 for Windows and Mac OS X
Download iOS 4 for iPhone 3GS, iPhone 3G and iPod touch
Download .NET Framework 3.5 (required to run Sn0wbreeze)
Download Sn0wbreeze 1.6 / 1.6.1 for 4.0 (Windows Only) [Fast Mirror link]
Disclaimer: This guide is for testing & educational purposes only. Follow it on your own risk. I’m not responsible for any loss of important data or malfunctioning of your iPhone.
UPDATE 1: Sn0wbreeze 1.6.1 is now available. Download Sn0wbreeze 1.6.1 for 4.0 from the updated link given above.
You may also like to check out:
You can follow me on twitter to keep yourself updated on all the latest jailbreaking and unlocking releases.

Source: redmondpie

Fix 1604, 1600 Error During iOS 4 Custom Firmware Restore in Tunes


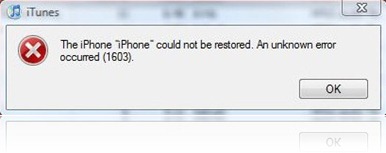
Some of you might have noticed the annoying 16041600 error when restoring to iOS 4custom firmware in iTunes which is built using PwnageTool 4.0 or 4.01. The error in question looks something on the lines of this.

The iPhone "[your iPhone]" could not be restored. An unknown error occurred.
16xx and 21 Error in iTunes during iPhone 3.1 Restore
Going through the comments posted here, I found this fix posted by one of our reader which I thought I should share it with you all. I haven’t tried this because I never got the error, but if you did get the error, let us know if the instructions posted below fixes the issue.
The instructions, as posted by Carlos Leopoldo are as follows:
Steps to fixing 1604 iPhone restore error:
1. There is no need to reinstall iTunes or whatever. Keep the same version that you have used to restore or backup previously.
2. Make sure that iPhone is disconnected from your computer and that iTunes is closed.
3. The following step of fixing 1604 iPhone restore error is Windows XP specific, if you are a Mac user, you may have to locate the folders yourselves as I am not sure: Go to folder C:\Documents and Settings\\Application Data\Apple Computer\iTunes\iPhone Software Updates. You will see one or more files. Cut and paste them somewhere else. Do not delete them in case the steps does not work for you, you can still copy them back to the folder. You can find out your username by doing a Ctrl-Alt-Del. If somehow you cannot find the folder, you are probably in the wrong user directory.
4. Launch iTunes and put your iPhone in recovery mode. Refer to this article on Unable To Restore iPhone on how to do put iPhone in recovery mode.
5. Proceed with restore and iTunes will download the update online. If you are downgrading to a lower version, do step 3 and leaving only the firmware file that you want to downgrade to. Double click on the file and iTunes will begin the restore.
Please do share your results with us in the comments section below. Thanks.
You may also like to check out:
You can follow me on twitter to keep yourself updated on all the latest jailbreaking and unlocking releases.

Source: redmondpie

Wednesday, June 23, 2010

Fix iBooks After iOS 4 Jailbreak with Redsn0w 0.9.5b5-4


Some users were complaining about newly released iBooks for iPhone having issues onjailbroken iOS 4 devices. The good news is that Redsn0w has been updated to version 0.9.5b5-4 in order to fix this problem. The official change log is as follows.

Redsn0w 0.9.5b5-4


There’s a new redsn0w beta (links were changed above) that should fix any iBooks problems people were seeing.  Just run this new version 0.9.5b5-4 and deselect Cydia (you don’t want to reinstall Cydia over itself).
Instructions to jailbreak iPhone 3G and iPod touch 2G on iOS 4 using Redsn0w 0.9.5 as usual are exactly similar to the last release. Please read all the instructions posted herecarefully before upgrading and jailbreaking your phone on iOS 4.
Once you have jailbroken your phone, you can unlock it using ultrasn0w 0.93 (on anybaseband), guide for which is posted here.

Download iOS 4
Download Redsn0w 0.9.5b5-4 for Mac
Download Redsn0w 0.9.5b5-4 for Windows
Download iTunes 9.2 for Windows and Mac
You may also like to check out:

You can follow me on twitter to keep yourself updated on all the latest jailbreaking and unlocking releases.

Source: redmondpie

Downgrade iPhone 3GS iOS 4.0 to 3.1.3 with Cydia SHSH


Apple released iOS 4.0, so as of today, Apple has stopped signing 3.1.3 restore files. That means that if you have a 3GS iPhone you cannot restore any firmware other than iOS 4. If you guys updated to iOS 4 and wanna go back to OS 3.1.3 or below here is the step by step guide to downgrade your iPhone 3GS iOS 4 to 3.1.3 or below. This hack can be attempted only for those, who saved their SHSH to Cydia Server before the release of iOS 4.0 via Cydia “make my life easier” button.
The process is very simple all you have to do is to add Saurik’s Server address to your system hosts file. This trick make iTunes thinks it is talking to Apple, it is talking to Cydia instead while the restoring process. Doing this will allow iTunes to access signatures already stored by Cydia “on file” feature. In simple words this duplicates the functionality exposed by Apple’s signature server, except using “on file” results rather than live request.

Note:
  1. This process is only for those who saved their SHSH to Cydia Server already.
  2. Read the whole process two-three times before starting the process.
_____________________________________________________________________________________
How to Edit and Save Hosts file in Windows
  • Open Notepad with Administrative privileges by clicking StartAll Programs,Accessories, and thenright-click Notepad and select to open as Administrator.
  • Now browse to (C:/Windows / System32 / drivers / etc) in Notepad and open the hosts file, and add the following entry to the bottom of the file.
    74.208.10.249    gs.apple.com               <————
Now you navigate to files menu and save the hosts file. By doing this you changed the communication server from Apple to Sauriks Server, because your ECID is on that server. Now you can put your iPhone in DFU mode to restore back to to OS 3.1.3 or lower. Follow our previous guide Downgrade iPhone 3G / 3GS
_____________________________________________________________________________________
How to Edit and Save Hosts file in Mac OS X
  • Navigate to Finder, Click to select Go to Folder… from the Go menu and Enter /etc into the input field and click the Go button.
  • Now look for hosts file, right click on hosts file and open with Text Edit, and add the following entry to the bottom of the file.
74.208.10.249   gs.apple.com <————


  • Now save the file and click on Save As.
  • Because Text Editor can’t save your system files, here comes the tricky part, in save as windows use the following settings, take a close look at the following image.


Uncheck the “ If no extension is provide, use .txt “ and then press the save button.

  • A host file will be appear on your Desktop, just drag and drop to /etc and follow the onscreen instructions. 

By doing this you changed the communication server from Apple to Sauriks Server, because your ECID is on that server. Now you can put your iPhone in DFU mode to restore to any of the previous OS. Follow our previous guide Downgrade iPhone 3G / 3GS
Stay tuned with us for your daily dose of iPhone news, you can follow us on twitter via @iTune2iPhone You can also subscribe to our daily free e-mail news letter and keep your self updated with the latest of iPhone community.
Source: ihackintosh

Save SHSH Blobs (ECID SHSH) of iOS 4 on Windows and Mac


TinyUmbrella has been updated to support the new iOS 4 on iPhone 3GS and iPod touch 2G/3G. iPad is also supported but iOS 4 for iPad isn’t available yet. iPhone 3G is not supported because you don’t need to save SHSH blobs for iPhone 3G, and older iPod touch (non MC model).
This is important if you want to jailbreak (by downgrading) your device again should Apple patches the exploit used by the new unlock and jailbreak tools. It is also important to note that you wont be able to save SHSH blobs once Apple has released the new firmware (iOS 4.0.1 / iOS 4.1). This is because Apple will stop signing the iOS 4 firmware once the new one has been released, hence negating you to save your iOS Device SHSH files.
Use the step by step guide posted below to save your SHSH blobs (ECID SHSH) of iPhone 3GS, iPod touch 2G/3G on iOS 4 without having to jailbreak your device.
Step 1: Download the latest beta version of TinyUmbrella for WindowsMac or Linux.
Step 2: Make sure you are running iTunes > 9.0. iTunes 9.2 is recommended.
Step 3: Start the program and plug in any ONE of the supported iDevices (iPhone/iPad/iPod touch).

SHSH Blobs iOS 4
Step 4: Click on “Save My SHSH”. TinyUmbrella will now grab the signature for you.
SHSH Blobs iOS 4 (1)
It will be enabled again once a ticket has been generated to save it to saurik’s server.
SHSH Blobs iOS 4 (2)
This is it ! You should be safe now. Make sure you save the signature for your iPhone, iPad and iPod touch on file before Apple releases the next firmware.
You may also like to check out:
You can follow me on twitter to keep yourself updated on all the latest jailbreaking and unlocking releases.

Source: redmondpie

Jailbreak iOS 4 iPhone 3GS, 3G and iPod touch 2G with PwnageTool 4.0 [How to Guide]


The official release of PwnageTool 4.0 for creating custom ipsw files for iOS 4.0 is now LIVE! The infamous iPhone Dev-Team has updated their PwnageTool for Mac to make it compatible with the newly released iOS 4 for iPhone 3GS, iPhone 3G and iPod touch 2G (non-MC model only). The custom .ipsw firmware files created with PwnageTool can update iPhone to iOS 4 without updating its baseband. iPod touch 2G MC model and iPod touch 3G is currently not supported.

iOS 4.0 Jailbreak
Some important notes from Dev-Team’s blog. MUST READ:
iPhone 3GS
Summary: Currently, PwnageTool only works on previously jailbroken 3GS devices with the old bootrom.
  • If you have a Jailbroken iPhone 3GS with the OLD BOOTROM and you DID NOT use Spirit to jailbreak then you can create the ipsw with PwnageTool 4.0 and restore with your jailbroken recovery mode. 
  • If you have an iPhone 3GS with the NEW BOOTROM this is NOT supported by PwnageTool 4.0
iPhone 3G
  • If you have a Jailbroken iPhone 3G at 3.1.2 (but not jailbroken with Spirit) then you should create the ipsw with PwnageTool 4.0 and restore from recovery mode or DFU mode.
  • If you have an out of the box iPhone 3G you should restore using a PwnageTool 4.0 ipsw using DFU mode.
  • If you have a Jailbroken 3.1.3 iPhone 3G it is very possible that this can fail from recovery mode, if this failure happens you will need to restore using DFU mode.
  • As an alternative to PwnageTool, you can use redsn0w on iPhone 3G (on both Windows and Mac) as mentioned in our last post.
IMPORTANT! Whenever you need to enter DFU mode, you will need to do so using PwnageTool.
iPod touch 2G
  • If you have an iPod touch 2G (non-MC model) that is jailbroken (but not with Spirit) then you can restore using recovery mode. 
  • As an alternative to PwnageTool, you can use redsn0w on non-MC iPod Touch 2G (on both Windows and Mac) as mentioned in our last post.
The following step-by-step instructions will help you jailbreak your iPhone running on iOS 4 with PwnageTool 4.0.
Step 1: Download and install the latest version of iTunes.
Step 2: Now start iTunes and sync your iPhone with your PC so that it backs-up all your important data including settings, apps, music, contacts and photos.
Step 3: Download PwnageTool 4.0 and the original iOS 4.0 for your version of iPhone or iPod touch (download links given below). Move all these files to your desktop.
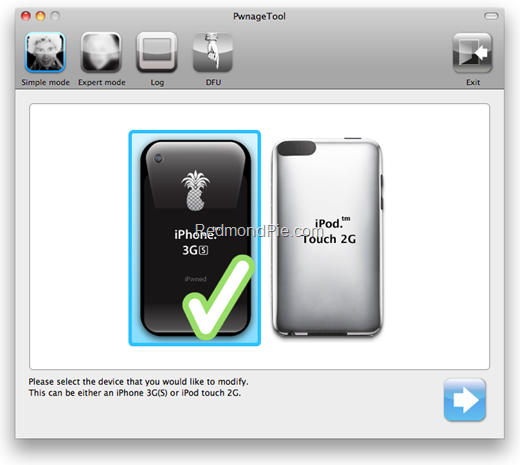
Step 4: Start PwnageTool 4.0 and select your device:
PwnageTool 4
Step 5: PwnageTool 4.0 will now automatically detect the correct firmware for your device as shown in the screenshot below:
iOS 4 Jailbreak (3)
Step 6: Click on "No" when PwnageTool asks you “Do you have an iPhone contract that would activate normally through iTunes?”:
PwnageTool 3.1.5 Jailbreak (1)
Clicking on “Yes” will update your baseband to the latest version. Click on “Yes” only if you are on an officially supported carrier like AT&T.
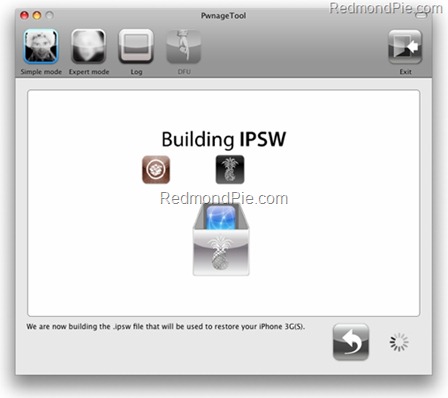
Step 7: PwnageTool will now create the custom .ipsw file for your iPhone which will be jailbroken.
PwnageTool 3.1.5 Jailbreak
The following ihaz Success” screen will confirm that the requested .ipsw file has been created successfully.
PwnageTool 3.1.5 Jailbreak
Step 8: Once the .ipsw file has been created, you will now have to restore your iPhone to this custom firmware 4.0 that you just cooked using PwnageTool 4.0 for your iPhone or iPod touch. Click on your phone icon from the sidebar in iTunes. Now press and hold left “alt” button (“Shift” button on Windows) on the keyboard and then click on “Restore” (Not “Update” or “Check for Update”) button in the iTunes and then release the “Shift” button.
This will make iTunes prompt you to select the location for your downloaded custom firmware 4.0. Select that custom .ipsw file and click on “Open”.
Step 9: Now sit back and enjoy as iTunes does the rest for you. This will involve a series of automated steps. Be patient at this stage and don’t do anything silly. Just wait while iTunes installs the new firmware 4.0 on your iPhone. Your iPhone screen at this point will be showing a progress bar indicating installation progress. After the installation is done, iPhone will restart automatically and you should now have a fully jailbroken iPhone running on iOS 4.
How to: Unlock iPhone on 4.0 (Any Baseband): Follow the complete step by step guide posted here to unlock iPhone 3GS and iPhone 3G, on iOS 4, on any baseband using Ultrasn0w 0.93.
Step 10: Once you are done with the unlocking and jailbreak process. You can now restore all your settings, apps, music, contacts and photos to the newly installed firmware version 4.0 by restoring the backup that you made in Step 2 from iTunes.
Alternate Guide for iPhone 3G and iPod touch 2G: Alternatively, iPhone 3G and iPod touch 2G (non MC model) users can use the latest version of Redsn0w too to jailbreak their iOS device on iOS 4. Step by step guide is posted here.
Disclaimer: This guide is for testing & educational purposes only. Follow it on your own risk. I’m not responsible for any loss of important data or malfunctioning of your iPhone.
Feel free to ask me any question here should you run into any problem during the jailbreak process.
Download iTunes 9.2 for Windows and Mac OS X
Download iOS 4 for iPhone 3GS, iPhone 3G and iPod touch
Download PwnageTool 4.0 for Mac OS X
You may also like to check out:
You can follow me on twitter to keep yourself updated on all the latest jailbreaking and unlocking releases.

Source: redmondpie

Tuesday, June 22, 2010

How to Jailbreak iOS 4.0 iPhone 3G and iPod touch 2G with Redsn0w 0.9.5b5-3


Redsn0w has been updated to bring jailbreak support for the newly released final version of iOS 4 for iPhone 3G and iPod touch 2G. Available for both Windows and Mac, redsn0wjailbreak tool additionally also enables options for multitasking and background wallpapers on iPhone 3G and iPod touch 2G which otherwise are disabled by Apple.
Redsn0w beta has been updated to hacktivate iOS 4.0 for iPhone3G (in addition to jailbreaking the iPhone3G and iPod Touch 2G).
For now, the redsn0w beta release supports only the iPhone3G and iPod Touch 2G at today’s 4.0. It’s still a beta, so you’ll need to let Cydia reorganize, reload, and update after using redsn0w.
Follow the step by step guide posted below to jailbreak your iPhone and iPod touch using Redsn0w.
Step 1: Download iOS 4 (final version) for your version of iPhone and iPod touch. Download links are posted here.
Step 2: Update to this latest firmware using the iOS file you just downloaded via iTunes 9.2.
Step 3: Start Redsn0w 0.9.5b5-3 (download link given below) and point it to the original iOS 4 firmware file to proceed.

Jailbreak iPhone OS 4
Step 4: Now select “Install Cydia” and click “Next”.
Jailbreak iPhone 4.0
Step 5: Now make sure your device is both OFF and PLUGGED IN to the computer before you click “Next”.
Step 6: Connect your device in recovery mode by pressing the Power and buttons continuously.
Jailbreak iPhone 4.0 Beta

At this stage you will be presented with a screen where you will have to quickly hold “Power” button and then while holding the “Power” button, you will now have to hold “Home” button too. Now after few seconds release “Power” button but keep holding “Home” button until installation begins.
Step 7: Sit back and enjoy while redsn0w will do all the rest for you. Once done, your iPhone and/or iPod touch will restart automatically and you will find it jailbroken on the latest iOS 4 firmware.
If you notice a blank white icon for Cydia with no sources. Go to the Sources panel and add http://apt.saurik.com/cydia-3.7 repo. Now restart your phone and you should see the regular standard Cydia logo with all the sources now.


How to Unlock 05.13.04, 05.12.01 to 04.26.08 on iOS 4 Using Ultrasn0w
Follow the complete step by step guide posted here to unlock iPhone 3G, on iOS 4, on anybaseband using Ultrasn0w 0.93.


Download redsn0w 0.9.5b5-3 for Mac 
Download redsn0w 0.9.5b5-3 for Windows


Disclaimer: This guide is for testing & educational purposes only. I’m not responsible for any loss of important data or malfunctioning of your iPhone.
You may also like to check out:
You can follow me on twitter to keep yourself updated on all the latest iPhone jailbreaking and unlocking releases.