5% Off Powermat

Join The Community

Wednesday, October 28, 2009

Fix Push Notifications on iPhone 3.1.2 Hacktivated

The following guide will help you in enabling Push Notifications on iPhone 2G/3G/3GS running iPhone firmware 3.1.2 which is both jailbroken and hacktivated. You will need to have an unlocked and jailbroken iPhone for this to work. Please refer to the guide here to unlock, and here to jailbreak your iPhone on 3.1.2 before you follow the steps below:

Fix Push Notifications on iPhone 3.1.2 Hacktivated
Step 1: Make sure you don’t have any of the Push-capable apps installed. Remove/Uninstall all Push-capable apps from your iPhone.
Step 2: Now start “Cydia” on your iPhone. Touch on “Manage” tab on the bottom and then on “Sources” as seen in the screenshot below:
Fix Push Notifications on iPhone 3.1.2 Hacktivated
Step 3: Touch on “Edit” and then on “Add”. You will be prompted to enter a url source as seen in the screenshot below. Type http://cydia.iphoneil.net” and touch on “Add Source”.
Fix Push Notifications on iPhone 3.1.2 Hacktivated
Cydia will now automatically update your sources by following a series of automated steps.
Step 4: After installation is completed. Search for “Push Fix” in Cydia and install this application. This app will automatically fix Push Notification System on your unlocked and jailbroken iPhone.
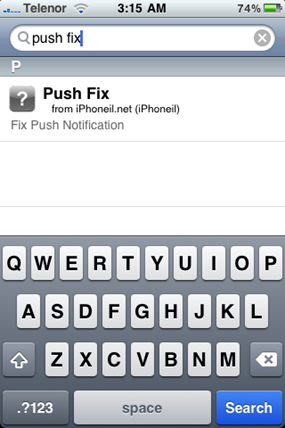
Fix Push Notifications on iPhone 3.1.2 Hacktivated
Step 5: After installing “Push Fix”, reboot your iPhone before installing any of the Push-capable apps.
Note: On a hacktivated iPhone 3.1.2, “Push Fix” app wont necessarily work as flawlessly as you would expect it to. You would miss some notifications here and there. However it should work flawlessly on a jailbroken iPhone 3.1.2 which is activated with iTunes through a supported carrier SIM.
You may also like to take a look at the following guides:


You can follow me on twitter to keep yourself updated on all the latest iPhone jailbreaking and unlocking releases.

Source: redmondpie

Tuesday, October 27, 2009

Fix iPhone 3.1.2 Tethering and Visual Voicemail VVM

Last week we posted a complete step by step guide on how to enable Internet Tethering option on your iPhone 3G/3GS running iPhone firmware 3.1.2 which was based on the hack, originally found by the Dev-Team. While the hack worked flawlessly for some, many specially AT&T users were forced to choose between enabling either Tethering option or visual voicemail (VVM).


W1kedZ has finally found a fix for AT&T users who relied on MobileConfig file fromhttp://help.benm.at to enable Internet Tethering on their iPhone’s. Follow the steps below to enable both Tethering and Visual voicemail (VVM) on your iPhone 3G/3GS running iPhone 3.1.2 firmware (for AT&T users only):
Step 1: You will need to first follow the complete detailed guide posted here to enable Internet Tethering on your iPhone from Step 1 – Step 10.
Step 2: Make sure you do not install the MobileConfig file fromhttp://www.benm.at/help/help.php as mentioned in UPDATE 1 of our guide posted here. If you already have it installed, then you must first remove it by navigating to Settings -> General –> Profiles on your iPhone before moving to the next step.
Step 3: Download and install the corrected MobileConfig file by browsing to this link from mobile Safari on your iPhone. This corrected MobileConfig file basically has correct APN settings for both VVM and Tethering so that they don’t interfere with each other.

That’s it! Tethering and Visual voicemail should now both be running perfectly on yourjailbroken AT&T iPhone 3G/3GS running firmware 3.1.2.
You can ask me any question should you run into any problem in enabling Tethering and Visual voicemail (VVM) on your iPhone running firmware 3.1.2.
You can follow me on twitter to keep yourself updated on all the latest iPhone jailbreaking and unlocking releases.

Source: redmondpie

Monday, October 26, 2009

Jailbreak iPhone 3.1.2 Firmware with blackra1n RC2


blackra1n RC2 is Live! George Hotz (aka geohot) has released an update to his already popular jailbraking tool named blackra1n which can jailbreak all iPhone’s (2G/3G/3GS) and iPod touches (1G/2G/3G) running iPhone firmware 3.1.2. Here’s what new in blackra1n RC2:

  • Fixed all issues that you might had when jailbreaking iPhone 3G with blackra1n RC1.
  • Tethered jailbreak for 3.1 OOTB iPod touch 8GB and all the new iPhone 3GS’s.
  • Fixed Icy issues.
  • Works on both Windows and Mac.
So, what is blackra1n? blackra1n is a 30 second ALL device 3.1.2 jailbreak. Even the ipt3, but the ipt3 is tethered. In order to boot it, just rerun blackra1n.
Jailbreaking instructions are exactly same as it were with blackra1n RC1. Please refer to our step-by-step guides posted below on how to jailbreak iPhone 2G/3G/3GS and iPod touch 1G/2G/3G with blackra1n RC2:

  • How to: Jailbreak iPhone 2G/3G/3GS and iPod touch 1G/2G/3G running iPhone 3.1.2 Firmware with blackra1n
If you liked this, then you may also like to check out the following guides:
You can follow me on twitter to keep yourself updated on all the latest iPhone jailbreaking and unlocking releases.
Download iPhone Firmware 3.1.2
Download blackra1n RC2 for Windows and Mac OS X

Source: redmondpie

Fix Missing Carrier logo After Jailbreak iPhone 3GS 3.1.2 Pwnage Tool


After jailbreak your iPhone 3GS firmware 3.1.2 with pwnage tool you must noticed that the carrier name or logo on the top left side of the status bar is missing. The reason why there is no carrier logo probably due to the baseband is not upgraded. PwnageTool keeps the old baseband 4.26.08 after updating. Many of you may used the Make it Mine trick but it’s ugly and it remains same when you enters to roaming. Another workaround editing the carrier.plist is also available but it takes time.
Carrier Logo Fixer is a new Tweak just landed on Cydia that allows to solve the problem of Carrier to all persons who have performed the Jailbreak your iPhone with PwnageTool and who have found themselves without the inscription of the name operator.

IMG_0111 


Just search and Install the Carrier Logo Fixer it’s available on Big Boss Repo which is by default by Cydia. We’ll continue to update you all with more details on Cydia tweaks. In the mean time stick with us on Twitter@iTune2iPhone.

Source: ihackintosh

Sunday, October 25, 2009

Firewall for iPhone and iPod Touch | Yes We aren’t Joking

If you remembered 2 months ago we detailed the Privacy an app by Saurik, if you missed that time then check here Your iPhone is Spying on You, Mine is not. This all happened when i-phone-home found and published that iPhone app Analytics is a service for iPhone app developers offered by Pinch Media, Mobclix, Medialets and Flurry that generates detailed statistics about the user of their app. Now i-phone-home creates another buzz by posting the first sneak preview of the very first firewall for iPhone. This is the first and one of a kind project for iPhone and iPod Touch, that alerts whenever a AppStore application requires usage, hidden, so our connection or access to our data (heading, UDID etc).

The application will work in two parts: the first will exploit the MobileSubstrate, remaining active but while still providing a good general, speed remaining within the limits of the RAM memory usage. Every time that we will be launching an application will appear an information menu and we will discover what you are trying to access.  When using a network-enabled application a prompt will be displayed giving you control over what hosts the application can connect to. As you can see the options are self explanatory:
IMG_0222-160x240
IMG_0221-160x240


The second part of the application, we can access through the dedicated icon and will be useful to amend and/or delete rules set to certain applications. Once you have selected an application, you will be able to drill down and configure the individual allow or deny rules.
We’ll continue to update you all with more details when they are available (such as availability, etc) till then stick with us on Twitter @iTune2iPhone.
Source: ihackintosh

Thursday, October 22, 2009

Search for text on any Website on your iPhone


Search for Text on Webpage using iPhone
When you are browsing on your iPhone have you come across the need to be able to search for a word on the website ? Traditionally this is not possible , but there is a hack to get this up and running on any iPhone and unlike the many other hacks this does NOT require you to Jailbreak your device.

Copy the following code on your iPhone, you can open the page in mobile Safari and copy it or copy and paste the following text into an e-mail and send it to yourself.
javascript:void%28s%3Dprompt%28%27Find%20text%3A%27%2C%27%27%29%29%3Bs%3D%27%28%27+s+%27%29%27%3Bx%3Dnew%20RegExp%28s%2C%27gi%27%29%3Brn%3DMath.floor%28Math.random%28%29*100%29%3Brid%3D%27z%27%20+%20rn%3Bb%20%3D%20document.body.innerHTML%3Bb%3Db.replace%28x%2C%27%3Cspan%20name%3D%27%20+%20rid%20+%20%27%20id%3D%27%20+%20rid%20+%20%27%20style%3D%5C%27color%3A%23000%3Bbackground-color%3Ayellow%3B%20font-weight%3Abold%3B%5C%27%3E%241%3C/span%3E%27%29%3Bvoid%28document.body.innerHTML%3Db%29%3Balert%28%27Found%20%27%20+%20document.getElementsByName%28rid%29.length%20+%20%27%20matches.%27%29%3Bwindow.scrollTo%280%2Cdocument.getElementsByName%28rid%29%5B0%5D.offsetTop%29%3B
If you cant see the code above, download this text file : SearchOnPage
Now open up Safari on your iPhone and go to any web site. Bookmark the website to your Safari bookmarks. After that, edit the bookmark you just bookmarked and erase title of the bookmark and name it “SearchOnPage” or whatever you want. Save it. Open the Bookmark and click on Edit and select SearchOnPage. Erase the entire http://www.whatever address line and double tap in the blank space and then tap on “Paste”. Click on Done.
To test it out, go to any website and then tap the bookmarks icon and select “SearchOnPage”. You will get a Popup. Type what ever you want to search in there. And then the app will tell you how many times the word has appeared on the webpage and then it will highlight the keyword in a yellow background. You should now be able to find text in whatever web site you’re currently on. Credits to the original author Rafael Cimatti for coming up with this great hack.

How to Solve iFunBox, iPhoneBrowser, DiskAid, and WinterBoard Issues After Using BlackRa1n


After jailbreaking using BlackRa1n, you may be facing an issue where you can’t access the root  folder of your iPhone using tools such as iFunBox, DiskAid, andiPhoneBrowser. Some users also report issues when using WinterBoard. I said it and I’ll say it again, BlackRa1n is crappy. If you have the option, I recommend using PwnageTool instead. It is a much more reliable and stable jailbreak than BlackRa1n.
The problem comes from the fact that BlackRa1n doesn’t add the afc2 support to your iPhone that is necessary for iPhoneBrowser, iFunBox, and DiskAid to access the file system and allow the transfer of files such as Winterboard  themes, NES ROMs, etc…  to the iPhone. In other words, you can’t access the root partition of your drive.
To fix this annoying issue, simply install the afc2add patch from Cydia then reboot your iPhone. Done!
Have you had many issues with BlackRa1n? Let us know what you think about this jailbreak by leaving a comment below.

Monday, October 19, 2009

Fix for Missing Carrier Logo on iPhone 3.1.2 Jailbreak


If you have got an unlocked and jailbroken iPhone 3G or iPhone 3GS running firmware 3.1.2, then you must have noticed by now that the carrier name or logo on the top left side of the status bar is missing as shown in the screenshot below:
Fix for Missing Carrier Logo on iPhone 3.1.2
According to Dev-Team, this is caused due to a known bug in ultrasn0w and PwnageTooland it is purely cosmetic, which means your phone works fine even without the carrier logo in place. Fortunately, there is a workaround to this which can bring back carrier logo of your choice:
Step 1: Goto “Cydia” on your unlocked and jailbroken iPhone 3.1.2, search for “MakeitMine” app and install this app.
Step 2: Start “MIM” app on your iPhone and type the name of your carrier:
Fix for Missing Carrier Logo on iPhone 3.1.2
Step 3: Touch on “Carrier” button on the top left to save your changes.
Voila! You should now have your carrier logo back in place on a jailbroken and unlock iPhone 3G/3GS running on firmware 3.1.2.
Fix for Missing Carrier Logo on iPhone 3.1.2
If you liked this, then you may also like checking out How to Enable Tethering on iPhone 3.1.2 Firmware.

Source: redmondpie

Jailbreak iPhone 3.1.2 Firmware with blackra1n


George Hotz (aka geohot), the kid who was the first to unlock the original iPhone back in 2007 and then iPhone 3GS in July of this year is back! This time he is the first one to release jailbreaking solution for the new iPhone 3.1.2 Firmware for all devices through his new tool called blackra1n. blackra1n is a software tool which can jailbreak (not unlock) all iPhone’s (iPhone (Edge), iPhone 3G and iPhone 3GS) and iPod touch’s (iPod touch 2G and 3G) running on firmware version 3.1.2. blackra1n is currently for Windows only, a Mac version of this app can be expected soon.
So, what is blackra1n? blackra1n is a 30 second ALL device 3.1.2 jailbreak. Even the ipt3, but the ipt3 is tethered. In order to boot it, just rerun blackra1n.
blackra1n - Jailbreak for iPhone 3.1.2 FirmwareImage via ModMyi
Follow the steps below to jailbreak all iPhone’s and iPod touches on OS 3.1.2:
Note for iPhone 3G and 3GS: Do NOT upgrade to iPhone 3.1.2 yet if you want to keep your unlock as doing so will result in upgrade of your baseband which will make it almost impossible for you to unlock.
Step 1: Download and install the latest version of iTunes (download link given below).
Step 2: You will now need to first update/restore to the original iPhone OS firmware 3.1.2 on your iPhone by using the latest version of iTunes. Download link for iPhone Firmware 3.1.2 is given at the end of the post.
iPhone OS Firmware 3.1.2
Step 3: Download blackra1n for Windows (download link at the end of the post).
Step 4: Start blackra1n app. If you are on Windows 7 or Vista, run the app with “Windows XP Compatibility” mode by enabling it from the “Properties” tab to avoid any errors during the jailbreak process.
Step 5: Click on “make it ra1n”:
blackra1n
Step 6: Let the app do its thing and wait for the phone to automatically reboot.
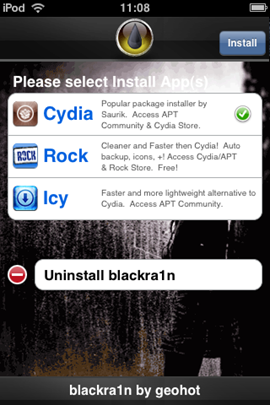
Step 7: You should now have “blackra1n” in the list of applications on your iPhone. Run “blackra1n”, download Cydia and let it install it.
blackra1n
blackra1nImage Credit: elmarseillais
Step 8: Finally reboot your iPhone. Voila! You should now have fully jailbroken iPhone or iPod touch running on firmware 3.1.2.
UPDATE 1: PwnageTool 3.1.4 has been released which can Jailbreak iPhone on 3.1.2 while keeping its baseband intact to 04.26.08. Complete step-by-step jailbreaking guide for Mac OS X can be found here and for Windows here. Unlocking guide for iPhone 3G and 3GS on 3.1.2 firmware can be found here.
UPDATE 2: blackra1n is now available for Mac OS X as well. Download link plus complete step-by-step instructions guide on how to jailbreak iPhone/iPod touch using blackra1n on Mac OS X can be found here.
UPDATE 3: Follow the step-by-step guide posted here to fix missing carrier name or logo on your unlocked and jailbroken iPhone 3G/3GS running firmware 3.1.2.
UPDATE 4: Follow the step-by-step guide posted here to Enable Tethering on iPhone 3.1.2 Firmware.
UPDATE 5: You may also like to check out How to: Patch MobileInstallation File on iPhone 3.1.2 Firmware.

Download iPhone firmware here
or
Download iPhone OS 3.1.2 for iPhone 2G
Download iPhone OS 3.1.2 for iPhone 3G
Download iPhone OS 3.1.2 for iPhone 3GS

Download blackra1n for Windows

Source: redmondpie

Jailbreak and Unlock iPhone 3.1.2 Firmware on Windows


PwnageTool 3.1.4 has been released and is for Mac OS X users only. The following step-by-step tutorial/guide will help you in running fully unlocked and jailbroken iPhone 2G,3G and 3GS with iPhone firmware 3.1.2 using your Windows PC without having to wait for Windows version of PwnageTool or redsn0w. Mac version of the tutorial can be foundhere.
If you don’t care about the unlock and just want to jailbreak your iPhone on 3.1.2, then you can also alternatively follow the guide posted here to jailbreak your iPhone on Windows with blackra1n in just 30 seconds.
Jailbreak iPhone 3.1.2 On Windows PC
Step 1: Make sure you have downloaded and installed the latest version of iTunes.
Step 2: Now connect your iPhone with your PC. You must connect it to a single usb port on the backside of your computer. Do not use any usb hub or the ports in the front as this could result in an error during update process.
Step 3: Start iTunes. Sync your iPhone with your PC so that iTunes backs-up all your important data including settings, apps, music, contacts and photos.
Step 4: As a Windows user, you will have to now download a custom firmware for your iPhone which has been cooked on a Mac using PwnageTool 3.1.4. Don’t ask us for the download links for these custom firmware files for the obvious reasons. Just Google it:
  • For iPhone 2G: “iPhone1,1_3.1.2_7D11_Custom_Restore”
  • For iPhone 3G: “iPhone1,2_3.1.2_7D11_Custom_Restore”
  • For iPhone 3GS: “iPhone2,1_3.1.2_7D11_Custom_Restore”
and use one of the torrent links to download the custom created .ipsw file
Step 5: Once you have downloaded the required .ipsw file, Move it into the following location depending on which version of Windows you are using:
“C:\Users\[username]\AppData\Roaming\Apple Computer\iTunes\iPhone Software Updates\”(Windows 7)
“C:\Users\[username]\AppData\Roaming\Apple Computer\iTunes\iPhone Software Updates\”(Windows Vista)
“C:\Documents and Settings\[username]\Application Data\Apple Computer\iTunes\iPhone Software Update\” (Windows XP)
Note: Make sure you have enabled “Show Hidden Files and Folders” option in Tools->Folder Options.. –> View tab found in Windows Explorer to see the directory locations mentioned above.
Step 6: Restart iTunes. You will now be prompted to install the new firmware 3.1.2 from iTunes. DO NOT UPDATE from this prompt. Just close this dialog by clicking on “x” from the top right-most corner of the window.
Step 7: Now you will have to restore your iPhone to this custom firmware 3.1.2 that you have just downloaded for your iPhone. Click on your phone from the sidebar in iTunes to get to this screen as shown in the screenshot below:
iTunes 9.0.1 on Windows 7
Step 8: Press and hold left “Shift” button on the keyboard and then click on “Restore” (Not “Update” or “Check for Update”) button in the iTunes and then release the “Shift” button.
This will make iTunes prompt you to select the location for your downloaded custom firmware 3.1.2. Select that custom .ipsw file and click on “Open”.
iPhone2,1_3.1.2_7D11_Custom_Restore
Step 9: Now sit back and enjoy as iTunes does the rest for you. This will involve a series of automated steps. Be patient at this stage and don’t do anything silly. Just wait while iTunes installs the new firmware 3.1.2 on your iPhone. Your iPhone screen at this point will be showing a progress bar indicating installation progress. After the installation is done, iPhone will restart automatically and you should now have a fully jailbroken iPhone running on firmware 3.1.2.

How to: Unlock iPhone on 3.1.2 Firmware:
You can now follow the tutorial/guide posted here to unlock your iPhone 3GS or iPhone 3G on firmware 3.1.2 using ultrasn0w.

Step 10: Once you are done with the unlocking and jailbreak process. You can now restore all your settings, apps, music, contacts and photos to the newly installed firmware version 3.1.2 by restoring the backup that you made in Step 2 from iTunes.
UPDATE 1: Follow the step-by-step guide posted here to fix missing carrier name or logo on your unlocked and jailbroken iPhone 3G/3GS running firmware 3.1.2.
UPDATE 2: Follow the step-by-step guide posted here to Enable Tethering on iPhone 3.1.2 Firmware.
UPDATE 3: You may also like to check out How to: Patch MobileInstallation File on iPhone 3.1.2 Firmware.

Source: redmondpie

AppSync for iPhone 3.1.2 Jailbreak Firmware


AppSync patches MobileInstallation file on iPhone OS 3.x which is needed in order to install .ipa files manually without using iTunes. A new version of AppSync has now been released which is compatible with the latest iPhone 3.1.2 firmware. Make sure you havejailbroken your iPhone with firmware 3.1.2 before following the steps below. Complete step-by-step guide on how to jailbreak your iPhone with firmware 3.1.2 can be foundhere.
Here’s what you have to do to patch the mobileinstallation file on your iPhone:
Step 1: Start “Cydia” on your iPhone.
Step 2: Touch on “Manage” tab on the bottom.
Step 3: Now touch on “Sources” as seen in the screenshot below:

Step 4: Touch on “Edit”, and then on “Add”. You should now be prompted to enter a url source as seen in the screenshot below. Type “http://apt.macosmovil.com” and click on“Add Source”.


Cydia will now automatically update your sources by following a series of automated steps as shown in the screenshots below:


Step 5: After installation is completed. Search for “AppSync para OS 3.1(3.1.2)” in Cydia and install this application. This app will automatically patch mobileinstallation file on your iPhone running firmware 3.1.2.

You should now be able to install .ipa files manually on your iPhone running firmware 3.1.2.
UPDATE 1: Upon further investigation, I have found out that the original file version of “AppSync for OS 3.1(3.1.2)” which is posted at macosmovil repository is basically the same (v1.0) as the one posted earlier for OS 3.1, and both are compatible to work with iPhone OS 3.1.2.

Source: redmondpie

Recover iPhone 3GS from Apple Logo or Recovery Mode loop


Sometimes iPhone stucked at boot process and showed only an Apple logo (boot logo), some time it stucked on recovery mode loop i.e. iPhone starts in recovery mode after every restart. Here is a little tutorial on how to Recover iPhone 3GS from Apple Logo or Recovery Mode loop with the help of iRecovery. Thanks to Westbaer and Posixninja who made this awesome utility. iRecovery is a libusb-based command line utility for Mac OS X and Linux (perhaps Windows too). It is able to talk to the iBoot/iBSS in Apple’s iPhone/iPod touch via USB.
Run “ printenv “ comand in iRecovery and check your auto boot is set as false or true. For normal boot auto-boot should be set as true. If the auto-boot is flagged false then you have to set it as true. The following screenshot is from a iPhone 3GS which was stucked on Apple Logo, you can clearly see the auto-boot is set as false.

Here are the instructions below for changing your iPhone auto-boot from false to true with iRecovery for Windows and Mac OS X. Make sure while using iRecovery  your phone is on recovery mode, if it isn’t then put your phone in recovery mode using the following procedure.
  • Turn the device completely off and disconnect it from cable/dock.
  • Hold down the home button.
  • While holding down the home button connect to a computer with a cable (easiest) or dock.
  • Keep holding down the home button until you see a connect-to-iTunes screen You are now in recovery mode.
_____________________________________________________________________________________
Instruction’s For Mac OS X :
1) Download iRecovery package for Mac OSX and Unzip iRecovery folder to desktop.
2) Open terminal and perform cd ~/desktop
3) Now change the permission of both files to 777 by following commands.
chmod 777 libusb-0.1.4.dylib
chmod 777 iRecovery


4) Now launch Showallfiles you downloaded earlier, and Navigate usr > lib and copy the file libusb-0.1.4.dylib into that folder.
5) Drag-and-drop the iRecovery file into the Terminal so that you get a shortcut to it.
6) Append ‘-s’ to the end and press enter.


7) Execute the following commands
        setenv auto-boot true

            saveenvs
      fsboot

If the phone is still on boot loop then once again, just run through the procedure again. When my phone was stucked on Apple mode, I repeated the procedure 3 times and on third attempt my phone restored to usable condition. So don’t panic if you don’t succeed in first attempt. If the attempts fails then try again and this time replace “fsboot” with “reboot
_____________________________________________________________________________________
Instruction’s For Windows :

1) Download irecovery for Windows and unzip to Desktop. Install libusb from the downloaded pack for Windows users only Mac users can skip this step. If you are on Windows Vista then follow the steps given below to install Libusb-Win32.
  • Right click on this file. Select Properties | Compatibility Click the “Run this program in compatibility mode” box and select  “Windows XP (Service Pack2)” from the drop down list.
  • Right click again and select “Run as “Administrator”. Follow the installation instructions. Running the test program list the usb devices plugged into my computer – but not my new device.
2) Start iRecovery in Terminal / Console with iRecovery -s
3) Execute the following commands:
setenv auto-boot true
                saveenv
                fsboot
If the phone is still on boot loop then once again, just run through the procedure again. When my phone was stucked on Apple mode, I repeated the procedure 3 times and on third attempt my phone restored to usable condition. So don’t panic if you don’t succeed in first attempt. If all attempts fails then try again and this time replace “fsboot” with “reboot
Source: ihackintosh